Sunday 9 December 2012

Build Review - Classic Airframes 1/48 Avro Anson Mk.I

In this world of modelling the sleek and sexy lines of Spitfires and Phantoms, it is very rewarding every now and then to get to grips with something a little more traditional. The Avro Anson is a pre war design that wins no beauty contests, but was a spectacularly successful aircraft in its class. More were built over its lifetime than were Lancasters. It also oozes charm as a model. So it was with some excitement that I accepted a commission to build one.

To build one in 1/48 scale, there is only one choice, the Classic Airframes kit. I have had a love/hate relationship with C.A. for many years. They are very often the only choice for specific aircraft but the kits are for experienced modellers only. This one is no exception. The large pieces are moulded in "limited run" style soft plastic and all other components are in resin. I am not a great fan of resin used in this way. It is always good for detailing kits with cockpits, seats and such as an "add on" but the majority of the resin parts in this kit could have been perfectly well moulded in plastic with no loss of detail. Also without the hassle of detaching them from mould plugs and their incredibly brittle nature (which would haunt me in this build). But that aside. the plastic exhibits a good level of detail on the fuselage and wings and dry fitting showed that the fit would be pretty good.


So I started with the cockpit which in this aircraft is quite an undertaking. The internal details are quite extensive and will be very visible so need taking time over. The plastic floor piece was sprayed interior green and I proceeded to add the side walls, seats, tables, and other details. The instrument panels are provided as photo etch parts over film dials which work very well. However the instructions are very vague and a bit of educated guesswork and trial and error is needed to get everything together correctly. A number of the spars (which are provided as resin) promptly broke when being detached from their plugs and had to be replaced with styrene rods (which they should have been in the first place IMHO). Seat belts are also provided as etch pieces which is a nice (and often overlooked) touch. A bit of dry brushing and an oil wash brought out the details nicely.

The framework around the interior (which is a very important part of the look of this plane) is provided as a highly delicate resin structure. I managed to detach the side pieces successfully without breakage and clean them up but the top structure was missing from the kit altogether. This has not happened to be since the old Airfix days! I rebuilt it using styrene rods which was probably a good thing.


The whole structure fitted rather well into the fuselage although I had to shave the front part of the floor on both sides to get the fuselage to close up correctly. After a few more etch and resin panels the fuselage went together. There are some locating pins but they are very primitive and almost useless so I added some lugs to help ensure a clean fit. Eventually everything lines up and the fuselage went together, and I taped it up securely and left it to dry thoroughly. A fair bit of filler was needed to get things smooth.

While drying, I masked up the extensive canopy sections using the Eduard mask set. This is not the sort of model that you want to have to mask up without some assistance so I do not apologise for that. The canopy sections then fitted to the fuselage remarkably well with just a smear of filler to blend them in. At this stage I also attached the tail pieces. These took some care as there is no locating slot or lug, just the parts butting up against the fuselage. The final fuselage section is the turret base, which has an optional blank version, but the customer definitely wanted the turret so the details therein were painted and installed.

Next I put the wings together. The top and bottom halves of the wings do not line up perfectly, and a lot of sanding was needed to get seamless leading and trailing edges. Also, the instructions are very vague as to the lining up of the interior of the wheel bays, and a lot of trial fitting was needed to get it right. But eventually I had a pair of nicely finished wings. But fitting them to the fuselage was problematic. The fit is actually very good, but as with the tail there is no location engineering, just the edges of the wing parts against a flat area of the fuselage. This requires some gymnastics in gluing and setting. Also, I found that the starboard wing ended up at completely the wrong angle. The dihedral of the Anson is almost flat (only a couple of degrees) but the starboard wing was raised by about ten degrees which as a) wrong and b) completely out of kilter with the other wing. So I padded the top half of the wing with some strips of styrene sheet which gave the correct dihedral but needed some extensive filling afterwards. This is a shame because the "default" fit was actually spot on.

The engines are provided in resin, and are nice representations of the rotaries which turned out nicely with a little dry brushing. The engine shrouds are also resin. This gives them a nice realistic thin edge but it took a long time and not a few shredded nerves in getting them detached from their plugs and cleaned up. And in fact one of them did crack but fortunately it did not need a repair as the crack was invisible under paint. They were also tricky to install over the engines, which had to have their cylinder tops trimmed to get them on, although fortunately the trimming is not visible under the shroud.

I started the painting by spraying the masked cockpit and glass areas with interior green. This was followed by an overall coat of primer. I am not usually a big fan of pre-shading, but I did so on this plane because it has that distinctive lattice structure on the wings that would need to be highlighted. I started then by spraying the underside with Alclad aluminium to represent the silver painted underside of all early Ansons. I masked off and picked out the metal panels with dark aluminium to provide some contrast. I also applied a little weathering at this stage rather than later as I find this works better on Alclad. A little black oil was used to accentuate the lattice and ribs and give some streaks.

The underside was masked off and the whole upper surface sprayed with my own mix of Tamiya acrylics to represent RAF dark earth. This is a notoriously difficult colour to get right. The only paint I know that gets it completely correct is Humbrol 29, but I really don't get on with Humbrol Acrylics and I am not about to start converting to enamels at this stage. I then Blu Tack masked the camouflage pattern and sprayed over the RAF green. The whole plane got a couple of coats of Klear ready for decaling.

The customer has asked for a specific plane, MW-F from 321 (Dutch) squadron. No suitable decal set is available for this one so I made my own for the lettering and orange triangle, although I used the kit decals for insignia as far as is possible. The kit provides no stencils, but the Anson had very few anyway so I forgave it that one.

After more varnish, I then gave the whole plane an oil wash to bring out the few panel lines that exist, and manually applied subtle oil streaks elsewhere. After a couple of matt varnish coats I then applied a little panel bleaching using light grey to further highlight the lattice work and main panels. After removing the masks on the canopy and turret a little cleaning up was required where some primer had bled under the masks. This was partly my fault for not sealing the masks properly but in my defence, this is very tricky on curved canopy surfaces!

I was worried that fixing the undercarriage would be tricky since there are no real positive locators for the legs and there is a lot of weight to support. However to be fair the parts went into place very well but I made sure plenty of glue and drying time was applied and it all held up well.

With some more weathering, the final addition of the aerials, exhausts and a few other superstructure bits she was all done.

So in conclusion, this is a tough kit to build. It is quite capable of producing a stunning result, but is not for the faint hearted or anyone who is not used to working with resin. I am extremely pleased with the finished model, as is the customer (which is what matters, after all!) but it was not all smooth sailing. Unfortunately, the kit attempts to substitute plastic components for resin where it is just not necessary or practical, and this does cause some grief. But the end result is what matters, and an Anson in 1/48 scale is hard to beat as a showcase model.

www.bowemodels.com


Monday 3 December 2012

Build Review - AeroClub 1/144 DeHavilland Mosquito

If you want to build a Mosquito in 1/144 scale, this is currently your only option. And it's hard to track down, having been out of production for some years. But they do crop up on the second hand market from time to time, so I was lucky to get my hands on one when a customer asked me for a replica of Guy Gibson's famous mount, in which he tragically lost his life in 1944 over the Netherlands.

Gibson's plane was an BXX, and this kit represents a B35, although after extensive research I could not find any visible difference except the engines used, which is not of great concern in this project! So what have I got myself into this time?

Emptying the box out on to the workbench does not create a particularly favourable impression. A single injection moulded sprue accompanied by a fair number of white metal parts, and duplicated vacuform canopies and bomb windows. The metal parts look perfectly passable, but the plastic is horrifying. It's moulded without any significant detail and is only just identifiable as the main pieces of a Mosquito with a fair bit of imagination. The plastic itself is incredibly thick and brittle, reminding me somewhat of bacolite. Interestingly, a pair of finely moulded metal pilots and seats is included which look pretty good all things considered, but the instructions point out that if you want to install them, you will need to dig some plastic out of the fuselage sides. Oh well, this is going to be a fun build. Not.

Measuring up the pilots against the fuselage proved the instructions right, some plastic was going to have to come out. So I scraped and ground away at the sidewall (such as it is in the scale) praying that the fuselage would not shatter into tiny pieces, it was that brittle. Fortunately I got away with it and finally managed to get the fit right. So I proceeded to paint up the seats and pilots. Ever tried painting a 1/144 scale pilot figure? It's certainly a challenge.

After much trial and error I finally got the fuselage halves together with the seats and pilots inside. Of course, the two fuselage halves are different lengths, just to add to the fun, and I needed to do a lot of shaving and sanding to get everything together right.

The next stage is to attach the engine nacelles to the wing parts. The appalling quality of the moulding means that this took much effort to get anything resembling a good fit but I got there eventually. The exhausts are provided as a one piece metal moulding that is supposed to slide in to the slot in the nacelles at a later stage. I know this was going to be problematic but decided to cross that bridge later.

Next on went the wings and tail to the fuselage, and suffice to say that the again the fit is absolutely dreadful and some surgery was needed to get flush fitting parts, essential to provide strength in these areas. I then had a lot of filling to do, and I am convinced that the end result contained more filler than plastic. But at least she was now starting to look like a Mosquito!

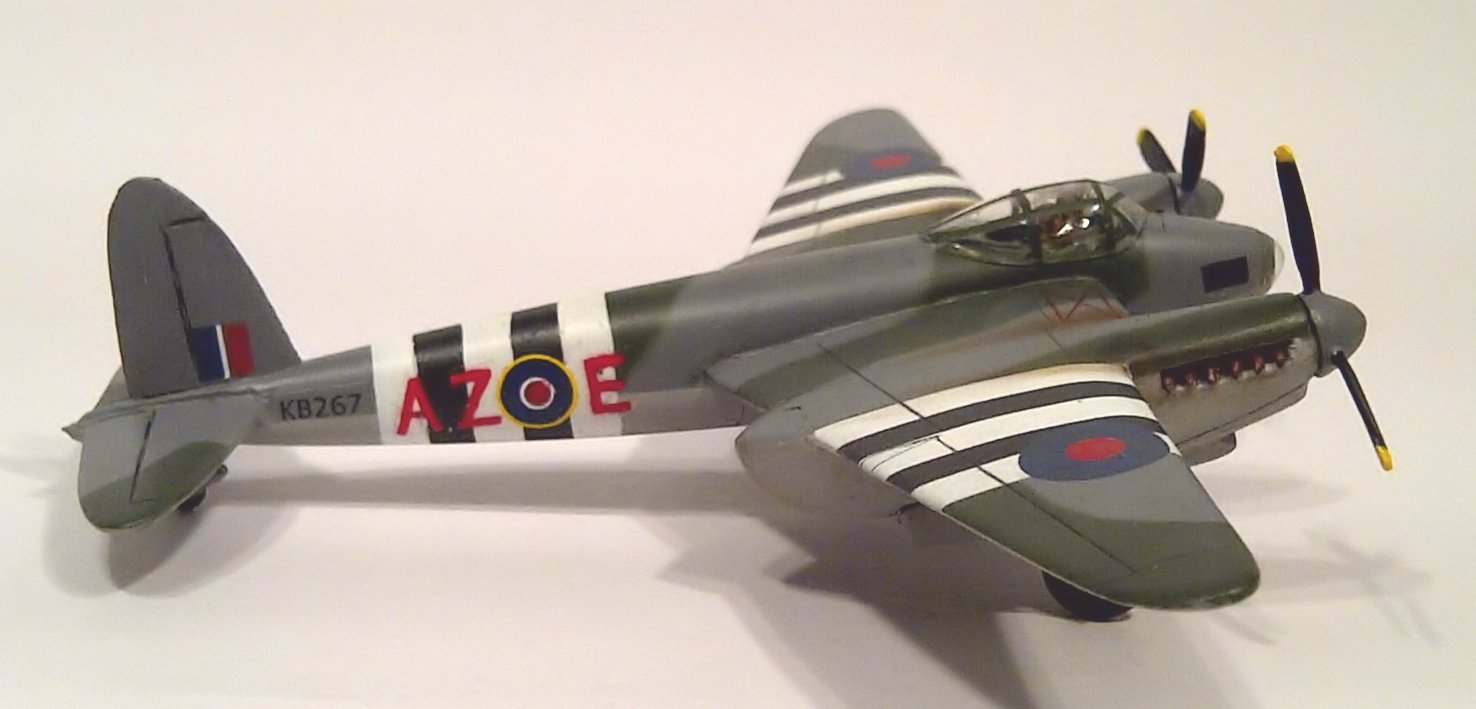
And now for the main painting. With all that filler, priming was essential. This was followed by light sea grey on the underside. This was masked off and the topside sprayed with dark sea grey. Then the old favourite Blu Tack masking technique gave me the camouflage pattern. It's very hard to get this convincing in 1/144 as however thin you roll it, Blu Tack seems to have a minimum bend angle that works great in larger scales, but makes it tricky to get a convincing pattern in the small scale. But I think it turned out OK. A coat of gloss later and she was set aside to dry.

To turn this into Guy Gibson's plane, I would need to print my own decals. Decals for military planes in this scale are like hens teeth and there was no hope of getting any in. So I designed up the necessary AZ-E scheme. Fortunately, I was able to use roundels from an existing sheet but the lettering and codes had to be scratch printed. I also generated my own "keep off" boxes for the top front of the wings as the ones on the kit sheet were ridiculously thick and bright. Decals done, another coat of gloss sealed them in.

While that was drying, I painted up the remaining metal parts which basically represented the exhausts, undercarriage, props and tail wheel. I also could not face the prospect of masking up a 1/144 vacuform Mosquito canopy and so printed off some decals strips and used these to represent the frames.

Once the gloss was dry, I scribed some panel detail on to the body of the plane (fortunately the "Mossie" has very little) and used black oil paint to highlight them. A final coat of matt varnish followed.

It only remained to attach the metal parts, which generally fit very well, unlike the majority of the rest of the kit. The undercarriage slotted in perfectly. But as anticipated, fitting the one piece metal exhaust stacks by sliding them through the engine nacelles proved impossible. So in the end I cut them in half and did it the "old fashioned" way as two pieces.

The last task was to put the vacuform items in place. I have to confess that I do not like vacuform canopies one bit. Sure, they are usually a better scale representation of the canopy, but they are a nightmare to cut out of their sheet and to sand/trim to shape to get them fitting snugly. And there is no positive surface to glue either! I did my best.

So, this kit is a perfect representation of how you can get away with murder if you are the only choice. A strategy adopted with relish by the likes of Fonderie Miniature (1/48 Halifax, anyone?) but for an ever popular plane like the Mossie it is high time that a mainstream manufacturer came to our aid, especially now that this scale is increasing in popularity. The metal parts are actually quite good - after all, this is what AeroClub are best known for, but the plastic is awful. Despite all the issues, however, I have to say that there is an immense satisfaction to be had from creating a respectable model from such an unpromising start.

Now the customer wants another one, so I guess at least I know what I am in for!

www.bowemodels.com